


Great storytelling with video requires organizing and presenting visual assets much like a filmmaker. Adobe Premiere Pro gives you the power to craft visual stories, and makes assembling, organizing, and editing video assets a lot easier.
In this post, I’ll show you how I used the software to produce a video for one of my clients.
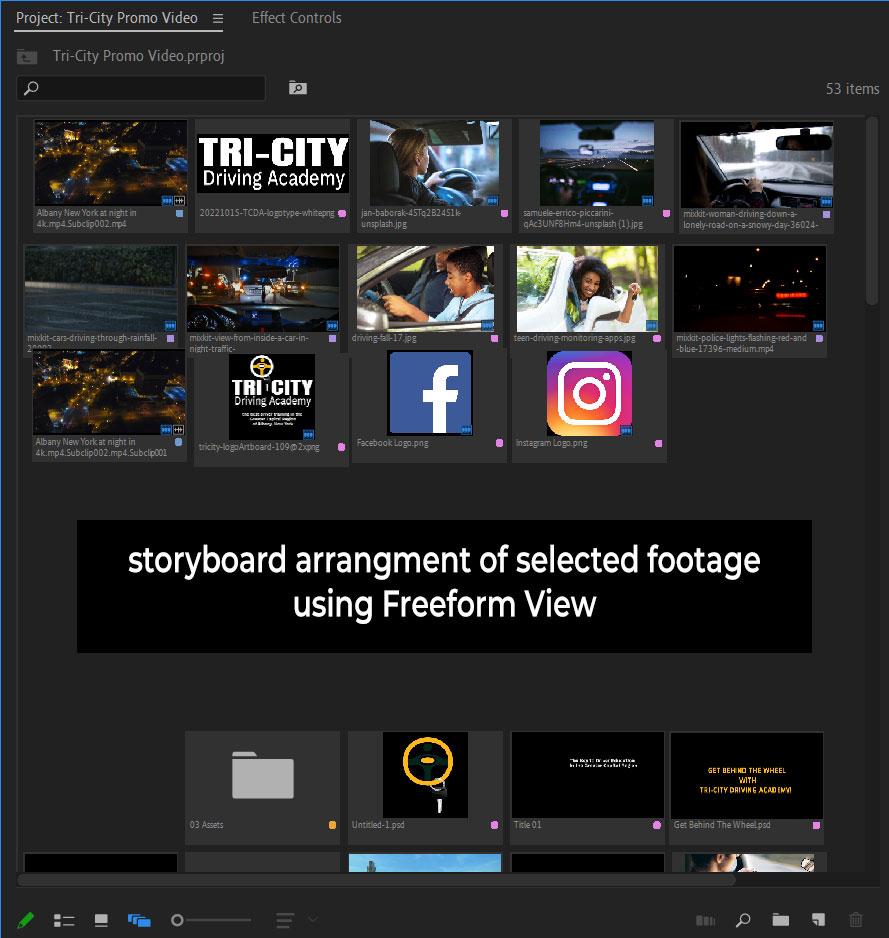
Storyboarding With Freeform View
For this project, I used Premiere Pro’s Freeform View to create a storyboard instead of writing a script. Freeform View is a canvas you can use to create visual variations of images and video before adding them to a sequence timeline. I played around with a couple of different layouts before deciding on the one pictured below.
I want every video story I create to captivate, educate, and motivate. Adobe Premiere Pro is the tool I use to make it happen.
Creating Subclips of Video Footage
Before I’m ready to assemble my footage on the project timeline, I’ll need to edit some of the video footage into smaller segments beforehand to make them fit into my one-minute time limit. Doing so also saves time from having to make major adjustments after the assets are on the timeline. Double-clicking on a clip in the project bin opens it up in the source monitor.
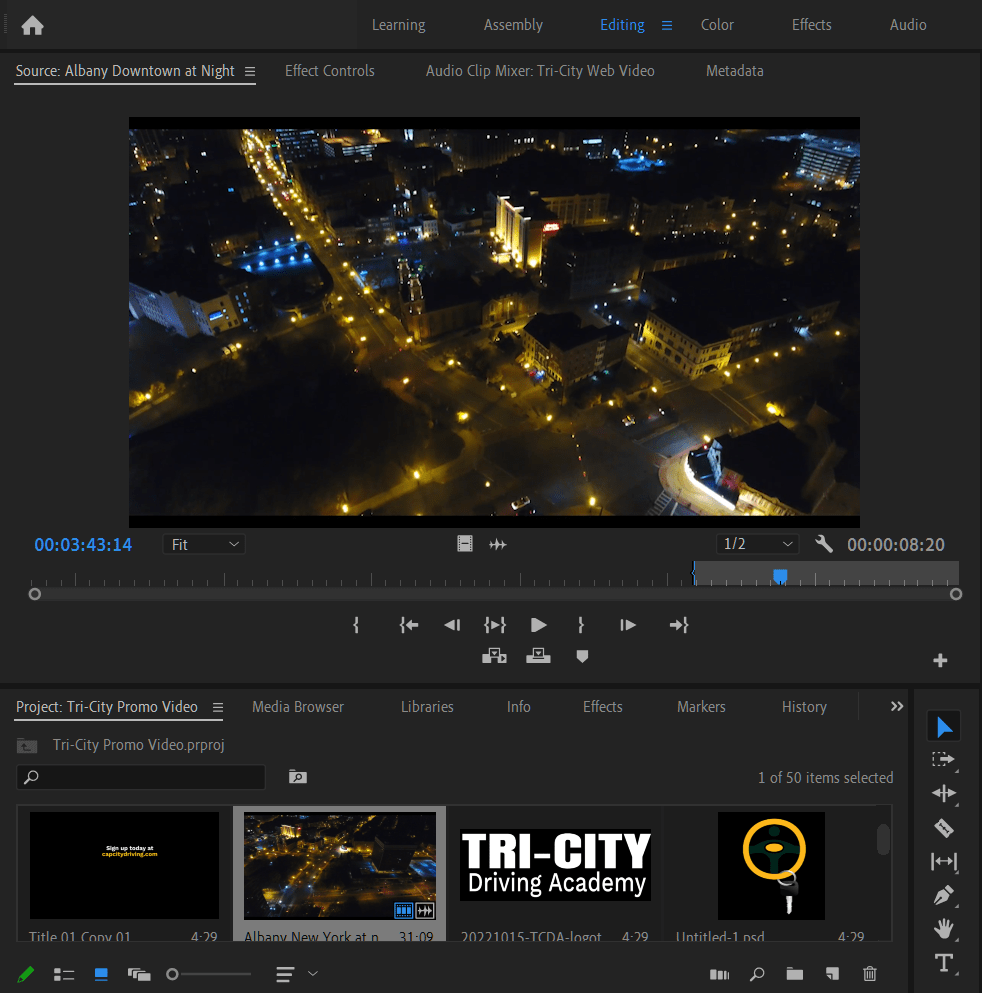
After scrubbing through the video, I mark desired in and out points and save the edited segment as a new separate clip. After repeating this process for each piece of video footage, I’m ready to build my timeline.
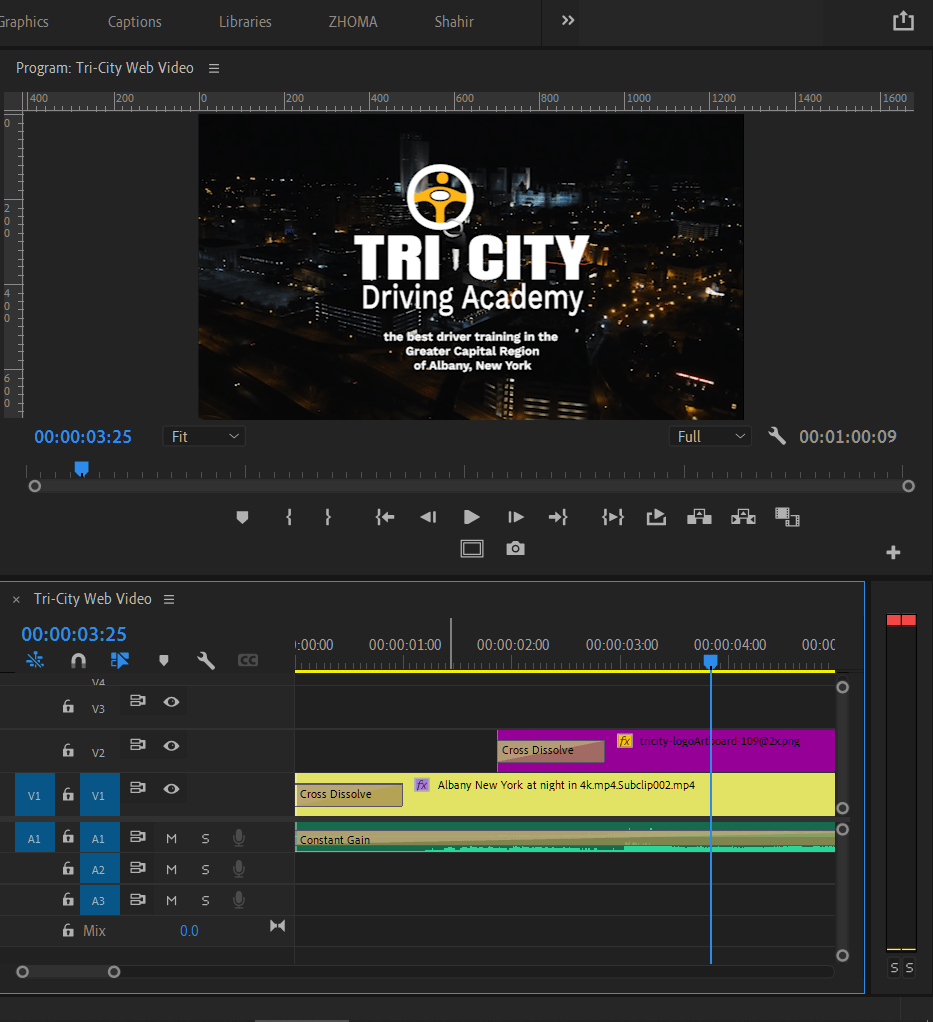
Constructing The Timeline
When I’m working with a video production which only has a music track, my preference is to add my music content first. This helps set the mood for the video production and gives me a reference point for shaping my edits of the other assets.
After I create a new 1080p HD sequence, I import a suitable jazz tune from my stock audio collection to the project. After creating a new clip of the right length and adding it to the timeline’s main audio track, I drag in my visual asset which I storyboarded earlier using Freeform View. My opening title sequence features the client logo fading in over video footage and runs six seconds. The end sequence I create is almost identical but runs fifteen seconds because it includes contact and social media information.
Adjusting Duration of Clips
Now it’s time to edit the remaining assets so they fit within the forty-four remaining seconds.
Professional film editors make their cuts to keep the audience oblivious to the manipulation of those “invisible” cuts. With that thought in the back of my mind, I want to tell a story that captivates, educates, and motivates. Adobe Premiere Pro is merely the tool I use to make it happen.
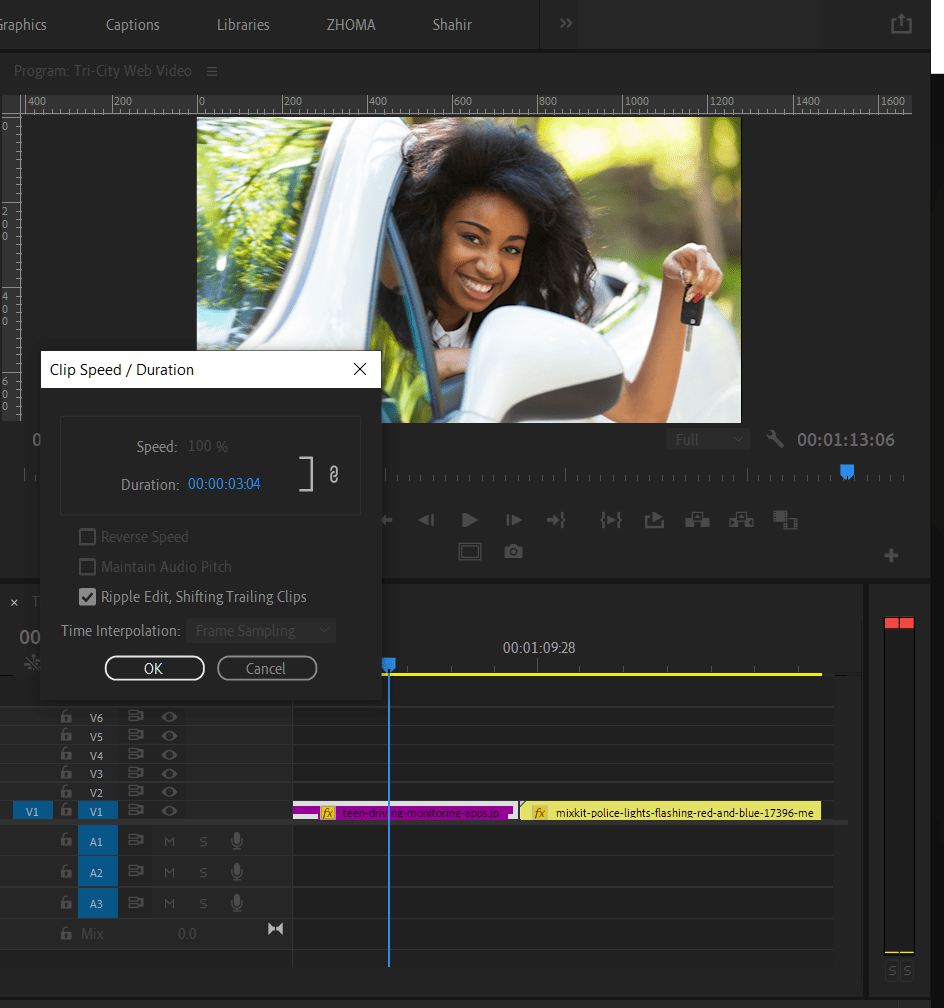
Because Premiere Pro automatically sets a five-second duration on imported still images, I adjust their on-screen duration to jibe with the flow and pacing of the music being careful to not disturb the story’s emotional impact. Right-clicking on a timeline image brings up a menu. I choose Speed and Duration, making sure the Ripple Edit, Shifting Trailing Clips box is checked.
I like to complete this stage of my editing before the timeline is crowded with titles and graphics.
Once again turning my attention to the video footage, I make a few minor adjustments until I’m satisfied with the flow of the story.
Keyframing Still Images
The subliminal message in this video is all about motion, as in that exhibited by a moving car. To keep in line with that theme, I need to add simulated motion—zooming and panning—to my still images, also known as the Ken Burns effect.
Adding motion keyframes to a still image involves setting initial values in scale and/or position for the image in Premiere Pro and doing the same for respective end values. When the video is played back the gradual change in over the playback time gives the appearance of motion.
I wrote about the Ken Burns effect in this post. There is also an excellent video tutorial from Terry White on YouTube which explains it in greater detail.
Resist the urge to get wrapped up in using too many visual gimmicks…The forward momentum of the story should carry the production, not the other way around. If the story’s not holding up on its own, consider revising it until it does.
Motion Graphics, Titles, and Transitions
The final phase of my editing involves making final adjustments before adding titles and motion graphics. If needed, I apply color correction and other aesthetic improvements before adding motion graphics and titles.
For this project, I created three minimalist animated lower third overlays in After Effects. I exported each of these as AVI files with transparent alpha channels and imported them into the project. After placing them above the driver education course footage, I created the rest of the on-screen text in the Premiere Pro graphics panel.
Regarding motion graphics, a word of caution is in order here. Resist the urge to get wrapped up in using too many visual gimmicks. Some of the After Effect templates on the market can be a bit overwhelming and distracting. The forward momentum of the story should carry the production, not the other way around. If the story’s not holding up on its own, consider revising it until it does.
The last thing I do before exporting my MP4 file is add in simple fade transitions to desired elements.
Parting Shots
I hope you’ve enjoyed my guided tour of how I craft visual stories with Adobe Premiere Pro. The software is the perfect tool for visual storytelling production—putting assembly, organization, and editing right at your fingertips. That is why professional filmmakers rely on it. You’ll have to take time to explore its layouts and features to integrate it into your video making workflow.
But keep in mind it’s only a software tool. The storytelling is up to you.
Share This Story!
Related Posts


Great storytelling with video requires organizing and presenting visual assets much like a filmmaker. Adobe Premiere Pro gives you the power to craft visual stories, and makes assembling, organizing, and editing video assets a lot easier.
In this post, I’ll show you how I used the software to produce a video for one of my clients.
Storyboarding With Freeform View
For this project, I used Premiere Pro’s Freeform View to create a storyboard instead of writing a script. Freeform View is a canvas you can use to create visual variations of images and video before adding them to a sequence timeline. I played around with a couple of different layouts before deciding on the one pictured below.
I want every video story I create to captivate, educate, and motivate. Adobe Premiere Pro is the tool I use to make it happen.
Creating Subclips of Video Footage
Before I’m ready to assemble my footage on the project timeline, I’ll need to edit some of the video footage into smaller segments beforehand to make them fit into my one-minute time limit. Doing so also saves time from having to make major adjustments after the assets are on the timeline. Double-clicking on a clip in the project bin opens it up in the source monitor.
After scrubbing through the video, I mark desired in and out points and save the edited segment as a new separate clip. After repeating this process for each piece of video footage, I’m ready to build my timeline.
Constructing The Timeline
When I’m working with a video production which only has a music track, my preference is to add my music content first. This helps set the mood for the video production and gives me a reference point for shaping my edits of the other assets.
After I create a new 1080p HD sequence, I import a suitable jazz tune from my stock audio collection to the project. After creating a new clip of the right length and adding it to the timeline’s main audio track, I drag in my visual asset which I storyboarded earlier using Freeform View. My opening title sequence features the client logo fading in over video footage and runs six seconds. The end sequence I create is almost identical but runs fifteen seconds because it includes contact and social media information.
Adjusting Duration of Clips
Now it’s time to edit the remaining assets so they fit within the forty-four remaining seconds.
Professional film editors make their cuts to keep the audience oblivious to the manipulation of those “invisible” cuts. With that thought in the back of my mind, I want to tell a story that captivates, educates, and motivates. Adobe Premiere Pro is merely the tool I use to make it happen.
Because Premiere Pro automatically sets a five-second duration on imported still images, I adjust their on-screen duration to jibe with the flow and pacing of the music being careful to not disturb the story’s emotional impact. Right-clicking on a timeline image brings up a menu. I choose Speed and Duration, making sure the Ripple Edit, Shifting Trailing Clips box is checked.
I like to complete this stage of my editing before the timeline is crowded with titles and graphics.
Once again turning my attention to the video footage, I make a few minor adjustments until I’m satisfied with the flow of the story.
Keyframing Still Images
The subliminal message in this video is all about motion, as in that exhibited by a moving car. To keep in line with that theme, I need to add simulated motion—zooming and panning—to my still images, also known as the Ken Burns effect.
Adding motion keyframes to a still image involves setting initial values in scale and/or position for the image in Premiere Pro and doing the same for respective end values. When the video is played back the gradual change in over the playback time gives the appearance of motion.
I wrote about the Ken Burns effect in this post. There is also an excellent video tutorial from Terry White on YouTube which explains it in greater detail.
Resist the urge to get wrapped up in using too many visual gimmicks…The forward momentum of the story should carry the production, not the other way around. If the story’s not holding up on its own, consider revising it until it does.
Motion Graphics, Titles, and Transitions
The final phase of my editing involves making final adjustments before adding titles and motion graphics. If needed, I apply color correction and other aesthetic improvements before adding motion graphics and titles.
For this project, I created three minimalist animated lower third overlays in After Effects. I exported each of these as AVI files with transparent alpha channels and imported them into the project. After placing them above the driver education course footage, I created the rest of the on-screen text in the Premiere Pro graphics panel.
Regarding motion graphics, a word of caution is in order here. Resist the urge to get wrapped up in using too many visual gimmicks. Some of the After Effect templates on the market can be a bit overwhelming and distracting. The forward momentum of the story should carry the production, not the other way around. If the story’s not holding up on its own, consider revising it until it does.
The last thing I do before exporting my MP4 file is add in simple fade transitions to desired elements.
Parting Shots
I hope you’ve enjoyed my guided tour of how I craft visual stories with Adobe Premiere Pro. The software is the perfect tool for visual storytelling production—putting assembly, organization, and editing right at your fingertips. That is why professional filmmakers rely on it. You’ll have to take time to explore its layouts and features to integrate it into your video making workflow.
But keep in mind it’s only a software tool. The storytelling is up to you.