So you purchased the Avada theme…
You made a wise investment.
When it comes to the heavyweight division of WordPress themes Avada is always a top contender. Developed by ThemeFusion, Avada is a theme and website builder rolled into one. A one-time payment of $69 plus tax gets you a powerful website design tool without worrying about the hassles of recurring subscriptions.
But for first-time or novice users, Avada can be intimidating with all its features, multiple layouts, and settings. In this post, I’ll walk you through installing and activating the theme in WordPress. I’ll also share some tips to help speed up its customization so you can get down to designing your website.
Step 1: Install and Activate the Child Theme
If you’ve never installed a WordPress theme before, I outlined the steps in an earlier post.
If you downloaded the full installation package from the Envato website, you’ll have a zipped folder with a long name (themeforest-Bf2t5fwl-avada-responsive-multipurpose-theme.zip). Unzip this file. Browse to the subdirectory called Avada_Full_Package/Avada Theme/. There are two zipped files there: Avada.zip and Avada-Child-Theme.zip.
Install the parent theme from the WordPress dashboard panel (Appearance/Themes/Add New/Upload Theme) and browse to the directory where theme files reside. Select the Avada.zip and click OK to install it. Be sure to activate the theme. Repeat the process for the child theme.
The Avada child theme inherits the functionality, features, and style of the Avada parent theme. Any customizations you now make to your website will not change the parent theme. Likewise, when the parent them is updated with software patches, etc., the child theme will not lose its customization and settings.
Step 2: Register Theme and Install Core Plugins
Now, you’re ready to set up the Avada theme. Access the Avada dashboard from the WordPress panel. Enter the registration code you received in the email from Envato Market. Next, browse over to the maintenance tab and install and activate the Avada Core and Avada Builder plugins. Be sure these two plugins are active, or you won’t be able to customize your site.
Step 3: Import A Prebuilt Avada Demo Website

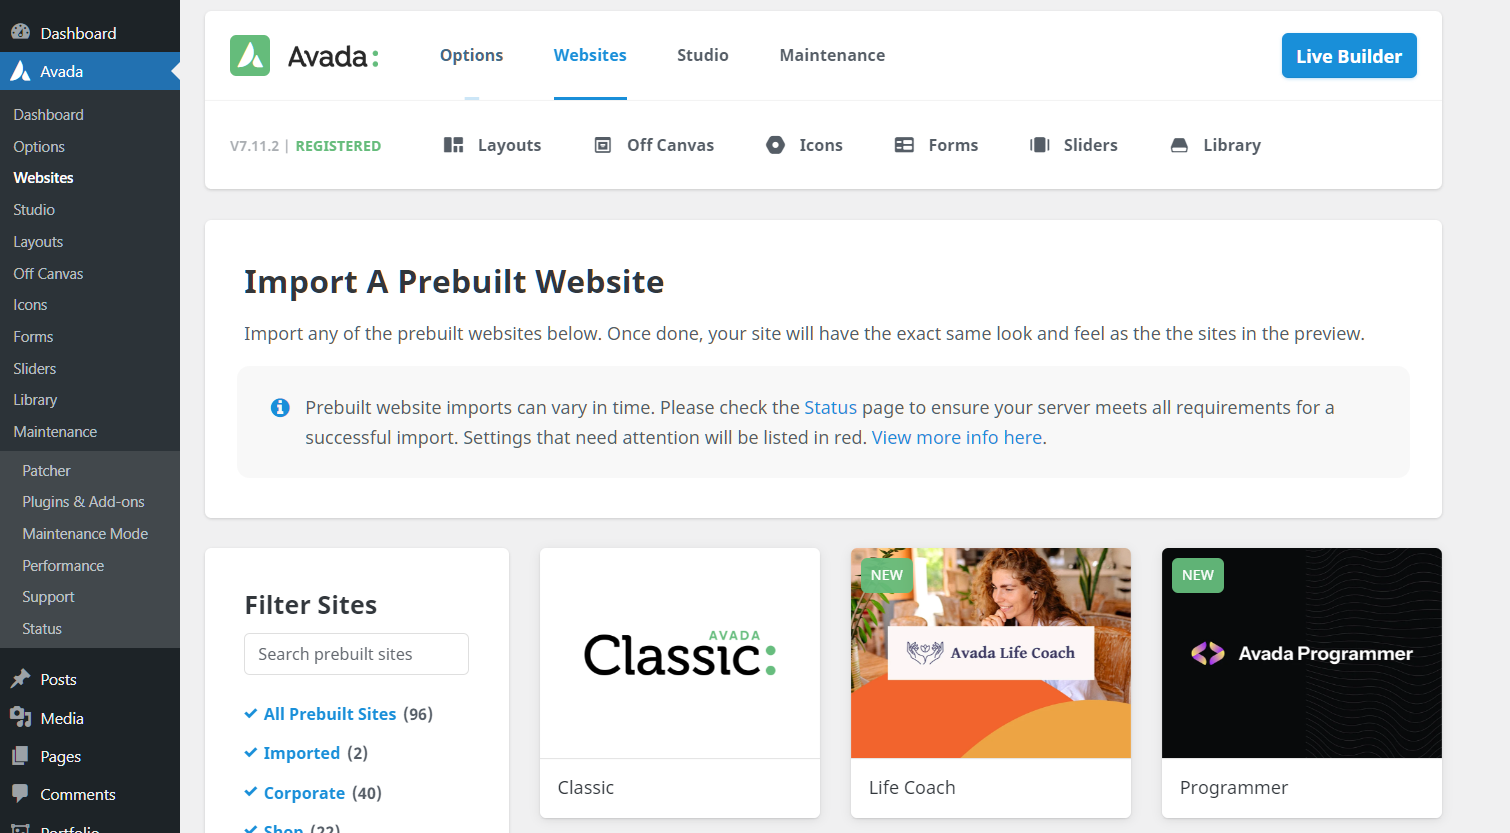
From the WordPress or Avada control panel click on the Websites subpanel or menu item. There are 89 demo sites available for import and new ones are being added periodically. You can filter the results based on site features, business type, or inclusion of one of six plugins.
Take your time and find one you like based on color scheme, typography, or overall look and feel. It doesn’t matter if it doesn’t correspond to the business you have. A demo site is a template you’ll customize based on your own design preferences. Look at how the demo site looks and its features. It’s easier to customize a site which has some or most of the design features you want.
Step 4: Start Customizing Your Site
There are several steps you need to take to make the website your own.
Site identity. First, customize the site identity panel from the WordPress dashboard (Appearances/Customize/Site Identity). Enter your site title and tagline if applicable. You can also upload a favicon if you have one. Make sure its at least 512×512 pixels with a transparent background. This will show up in the browser tab when someone goes to your website.
Logos and Favicon. Next, you’ll want to replace the default demo logos—one at regular size and the other at double-size for retina displays. Access the logo settings by selecting the Avada | Options | Logo subpanel.
You can view the information for the installed demo logos in the Media Library to determine the size of the logos and use them as a guide for sizing your own in Illustrator or Photoshop. The same goes for the mobile logo, sticky header logo, and the favicon if applicable. Be sure to save any changes.
Remember: many of the demo sites use different custom and global header and footer layouts for desktop and mobile displays. Logo design elements will need to be replaced in each of these locations.
Color palette. I recommend replacing or updating the demo website color palette before making any changes to demo content. The color palette lets you define up to 8 colors from which you can select one as the global theme color. Give colors a custom name and change HEX values. Be sure to save changes for them to take effect.
Typography. Also found in the Avada global options menu, global typography sets can be defined, changed, or deleted. Rename or edit the existing sets—choose a name, font, change sizing or spacing parameters—or add your own custom set. Detailed font settings, including color, can also be defined for each class within the body and heading groups and those used in posts.
Personally, I’ve found some of the demo heading sizes to be too large to my liking, so I like to change font size and line height for my design purposes, particularly for H1 and H2 sizes.
Headers, Footers, Menus, and Custom Layouts. Headers and footers styling is controlled within Avada’s global options, unless a global or customized layout setting takes precedence. The header layout can be automatically configured using one of seven layouts and uses the default logo and main menus.
If you opt to use a global header, you can configure it anyway you wish using the Layout Section Builder. Specific header and footer layouts can be set up and defined for all pages or for select pages, such as a custom 404 error page. Layouts can also be specifically configured for blog and portfolio posts, or sidebars just to name a few.
However, If you choose to go with a global or custom layout, pay attention to the demo design elements within those layouts which need to be changed—header text, logos, menus, and footer elements like the copyright text—and don’t forget to edit the independent layouts specifically configured for mobile displays.
Step 5: Create and Edit Site Content
Editing Page Content in Avada Builder. Page and post content is edited within the built-in Avada Builder, which can be used in visual mode or in text-centric mode for viewing formatting tags. The Builder functions in a container-style, content-block environment with columns and rows that can be manipulated for size, positioning, or spacing. The content library contains everything you need to create a page; containers for text, images, video, photo galleries, lightboxes, forms, and triggered off-canvas pop-ups.
Each page contains content display options that control display of page headers, sliders, page title bars, and other settings. However, some of these may be disabled when using custom layouts.
Preview page and post edits in your browser prior to publishing, using the Preview button and save drafts or publish your content in one workspace.
Avada Live Editor. Another editing option is to view and edit your content using the Avada Live editor. Select elements on the screen in real time and change properties. This option works better for those who don’t want to be bothered with the crowded workspace of the Builder.
Go From Demo To Your Own Website
And there you have it. A responsive website can be yours with no coding! I wrote and published this post this afternoon using the Avada theme. That’s how simple it is.
It does take some time to get comfortable with using Avada, but once you do, you too will be able to create your own amazing website designs with custom content!
If you are interested in using Avada for your website, why not download a free copy of A Quick-Start Guide to Designing WordPress Sites with Avada? You can also email me at designs@carlwhayes.com. I’ll be happy to answer any questions you might have.
All the best in your web design pursuits!
Share This Story!
So you purchased the Avada theme…
You made a wise investment.
When it comes to the heavyweight division of WordPress themes Avada is always a top contender. Developed by ThemeFusion, Avada is a theme and website builder rolled into one. A one-time payment of $69 plus tax gets you a powerful website design tool without worrying about the hassles of recurring subscriptions.
But for first-time or novice users, Avada can be intimidating with all its features, multiple layouts, and settings. In this post, I’ll walk you through installing and activating the theme in WordPress. I’ll also share some tips to help speed up its customization so you can get down to designing your website.
Step 1: Install and Activate the Child Theme
If you’ve never installed a WordPress theme before, I outlined the steps in an earlier post.
If you downloaded the full installation package from the Envato website, you’ll have a zipped folder with a long name (themeforest-Bf2t5fwl-avada-responsive-multipurpose-theme.zip). Unzip this file. Browse to the subdirectory called Avada_Full_Package/Avada Theme/. There are two zipped files there: Avada.zip and Avada-Child-Theme.zip.
Install the parent theme from the WordPress dashboard panel (Appearance/Themes/Add New/Upload Theme) and browse to the directory where theme files reside. Select the Avada.zip and click OK to install it. Be sure to activate the theme. Repeat the process for the child theme.
The Avada child theme inherits the functionality, features, and style of the Avada parent theme. Any customizations you now make to your website will not change the parent theme. Likewise, when the parent them is updated with software patches, etc., the child theme will not lose its customization and settings.
Step 2: Register Theme and Install Core Plugins
Now, you’re ready to set up the Avada theme. Access the Avada dashboard from the WordPress panel. Enter the registration code you received in the email from Envato Market. Next, browse over to the maintenance tab and install and activate the Avada Core and Avada Builder plugins. Be sure these two plugins are active, or you won’t be able to customize your site.
Step 3: Import A Prebuilt Avada Demo Website

From the WordPress or Avada control panel click on the Websites subpanel or menu item. There are 89 demo sites available for import and new ones are being added periodically. You can filter the results based on site features, business type, or inclusion of one of six plugins.
Take your time and find one you like based on color scheme, typography, or overall look and feel. It doesn’t matter if it doesn’t correspond to the business you have. A demo site is a template you’ll customize based on your own design preferences. Look at how the demo site looks and its features. It’s easier to customize a site which has some or most of the design features you want.
Step 4: Start Customizing Your Site
There are several steps you need to take to make the website your own.
Site identity. First, customize the site identity panel from the WordPress dashboard (Appearances/Customize/Site Identity). Enter your site title and tagline if applicable. You can also upload a favicon if you have one. Make sure its at least 512×512 pixels with a transparent background. This will show up in the browser tab when someone goes to your website.
Logos and Favicon. Next, you’ll want to replace the default demo logos—one at regular size and the other at double-size for retina displays. Access the logo settings by selecting the Avada | Options | Logo subpanel.
You can view the information for the installed demo logos in the Media Library to determine the size of the logos and use them as a guide for sizing your own in Illustrator or Photoshop. The same goes for the mobile logo, sticky header logo, and the favicon if applicable. Be sure to save any changes.
Remember: many of the demo sites use different custom and global header and footer layouts for desktop and mobile displays. Logo design elements will need to be replaced in each of these locations.
Color palette. I recommend replacing or updating the demo website color palette before making any changes to demo content. The color palette lets you define up to 8 colors from which you can select one as the global theme color. Give colors a custom name and change HEX values. Be sure to save changes for them to take effect.
Typography. Also found in the Avada global options menu, global typography sets can be defined, changed, or deleted. Rename or edit the existing sets—choose a name, font, change sizing or spacing parameters—or add your own custom set. Detailed font settings, including color, can also be defined for each class within the body and heading groups and those used in posts.
Personally, I’ve found some of the demo heading sizes to be too large to my liking, so I like to change font size and line height for my design purposes, particularly for H1 and H2 sizes.
Headers, Footers, Menus, and Custom Layouts. Headers and footers styling is controlled within Avada’s global options, unless a global or customized layout setting takes precedence. The header layout can be automatically configured using one of seven layouts and uses the default logo and main menus.
If you opt to use a global header, you can configure it anyway you wish using the Layout Section Builder. Specific header and footer layouts can be set up and defined for all pages or for select pages, such as a custom 404 error page. Layouts can also be specifically configured for blog and portfolio posts, or sidebars just to name a few.
However, If you choose to go with a global or custom layout, pay attention to the demo design elements within those layouts which need to be changed—header text, logos, menus, and footer elements like the copyright text—and don’t forget to edit the independent layouts specifically configured for mobile displays.
Step 5: Create and Edit Site Content
Editing Page Content in Avada Builder. Page and post content is edited within the built-in Avada Builder, which can be used in visual mode or in text-centric mode for viewing formatting tags. The Builder functions in a container-style, content-block environment with columns and rows that can be manipulated for size, positioning, or spacing. The content library contains everything you need to create a page; containers for text, images, video, photo galleries, lightboxes, forms, and triggered off-canvas pop-ups.
Each page contains content display options that control display of page headers, sliders, page title bars, and other settings. However, some of these may be disabled when using custom layouts.
Preview page and post edits in your browser prior to publishing, using the Preview button and save drafts or publish your content in one workspace.
Avada Live Editor. Another editing option is to view and edit your content using the Avada Live editor. Select elements on the screen in real time and change properties. This option works better for those who don’t want to be bothered with the crowded workspace of the Builder.
Go From Demo To Your Own Website
And there you have it. A responsive website can be yours with no coding! I wrote and published this post this afternoon using the Avada theme. That’s how simple it is.
It does take some time to get comfortable with using Avada, but once you do, you too will be able to create your own amazing website designs with custom content!
If you are interested in using Avada for your website, why not download a free copy of A Quick-Start Guide to Designing WordPress Sites with Avada? You can also email me at designs@carlwhayes.com. I’ll be happy to answer any questions you might have.
All the best in your web design pursuits!


![Why Use Video Content Marketing in 2022 [Infographic]](https://carlwhayes.com/wp-content/uploads/2022/04/Video-Content-Is-King-500x383.jpg)


