


When it comes to visually recounting real life, no other storytelling vehicle does it better for me than the documentary film. Now, when I say documentary films, I don’t want to confuse it with reality television. I’m talking about documentary films based on facts—real people, real places, and real events most often portrayed on screen using images and other archival footage.
If you’ve ever watched Ken Burns’ films—Jazz, The Civil War, Unforgiveable Blackness, and The West—you’ve seen how he masters the arts of using still images to enhance the visual and emotional impact of the stories he tells. Because there was little to no video footage to document the events portrayed on screen other than archived images, Burns applies simple effects to them in post-production to mimic the motion of video and bring them to life..
In this post, I’ll consider three editing techniques favored by documentary filmmakers you can use in your videos to enhance your video storytelling beyond the worn out and boring zoom, pan, and fade photo slideshow.
Enhance The Look of Your On-Screen Text
Another thing I’ve always liked about Ken Burns’ films is his simple, effective use of on-screen text in titles and lower thirds. In his nine-part documentary, The West, the film’s opening title is revealed in a large western-style serif font against the backdrop of breathtaking scenery and the haunting sounds of a Native American folk song.
When introducing episodes and subchapters, and rolling credits, Burns uses white text against a black screen and lets the audio soundtrack do its work. His choice of lower third overlays when introducing an expert on-screen is equally conservative—the expert’s name in all caps, and their professional title in mixed capitals just beneath their image. It’s not fancy, but his typography choices fit his production and keeps the focus on the story being told.
When used appropriately, on-screen text and lower thirds can enhance the introduction of still images in a video production. For example, in the video below, I introduce my graphic design portfolio using both the Ken Burns effect and a simple animated text to display the quote heard on the audio track. The text introduces me as the narrator and enhances the image’s connection to creativity while blending in with the soft music bed.

I used a couple of free After Effects title templates to create the quote and introduction title sequences. There are lots of free title motion graphics for After Effects and Premiere Pro available from sites like Premium Beat, Mixkit, and Motion Array, among others, if you’re interested in using or creating professional-looking animated text for your videos.
Use The “Ken Burns Effect” On Still Images
He didn’t invent it, but Burns pioneered the use of slow panning and zooming of still images, so much a staple in his films, it is now known as The Ken Burns Effect. You can use this technique in your videos. Non-linear editing software such as Adobe Premiere Pro and Final Cut allow users to set keyframes to control and seamlessly change image positioning and scaling.
Burns often starts by zooming in on a particular area of an image, far away from his intended end focal point. After the narration and/or audio track commences, the image begins to move and zoom out ever so slowly until the end focal point is revealed in the photo. The technique captures the viewer’s curiosity as he tries to imagine what is to come next. The speed of the motion across the image is dependent on keyframe spacing in relation to the clip length and any adjustments made to temporal interpolation—keyframe changes in time—in the editing software. Typically, the further apart the keyframes and the longer the clip, the slower the motion.
For this to work, you’ll need to use a photograph larger than your editing space to give you enough room for zooming and panning. In the example below, my editing space was set for 1920×1080 pixels. I used an image which measured 3864×2632 pixels, which gave me enough horizontal and vertical headroom with which to work.
A word of caution here. Resist the urge to upscale the image significantly in your video editing program or you could run into problems with pixelation and degradation of image quality. If the image you want to use is not large enough, you could rescan it or upscale the image in Photoshop or another image editing program as I did below.
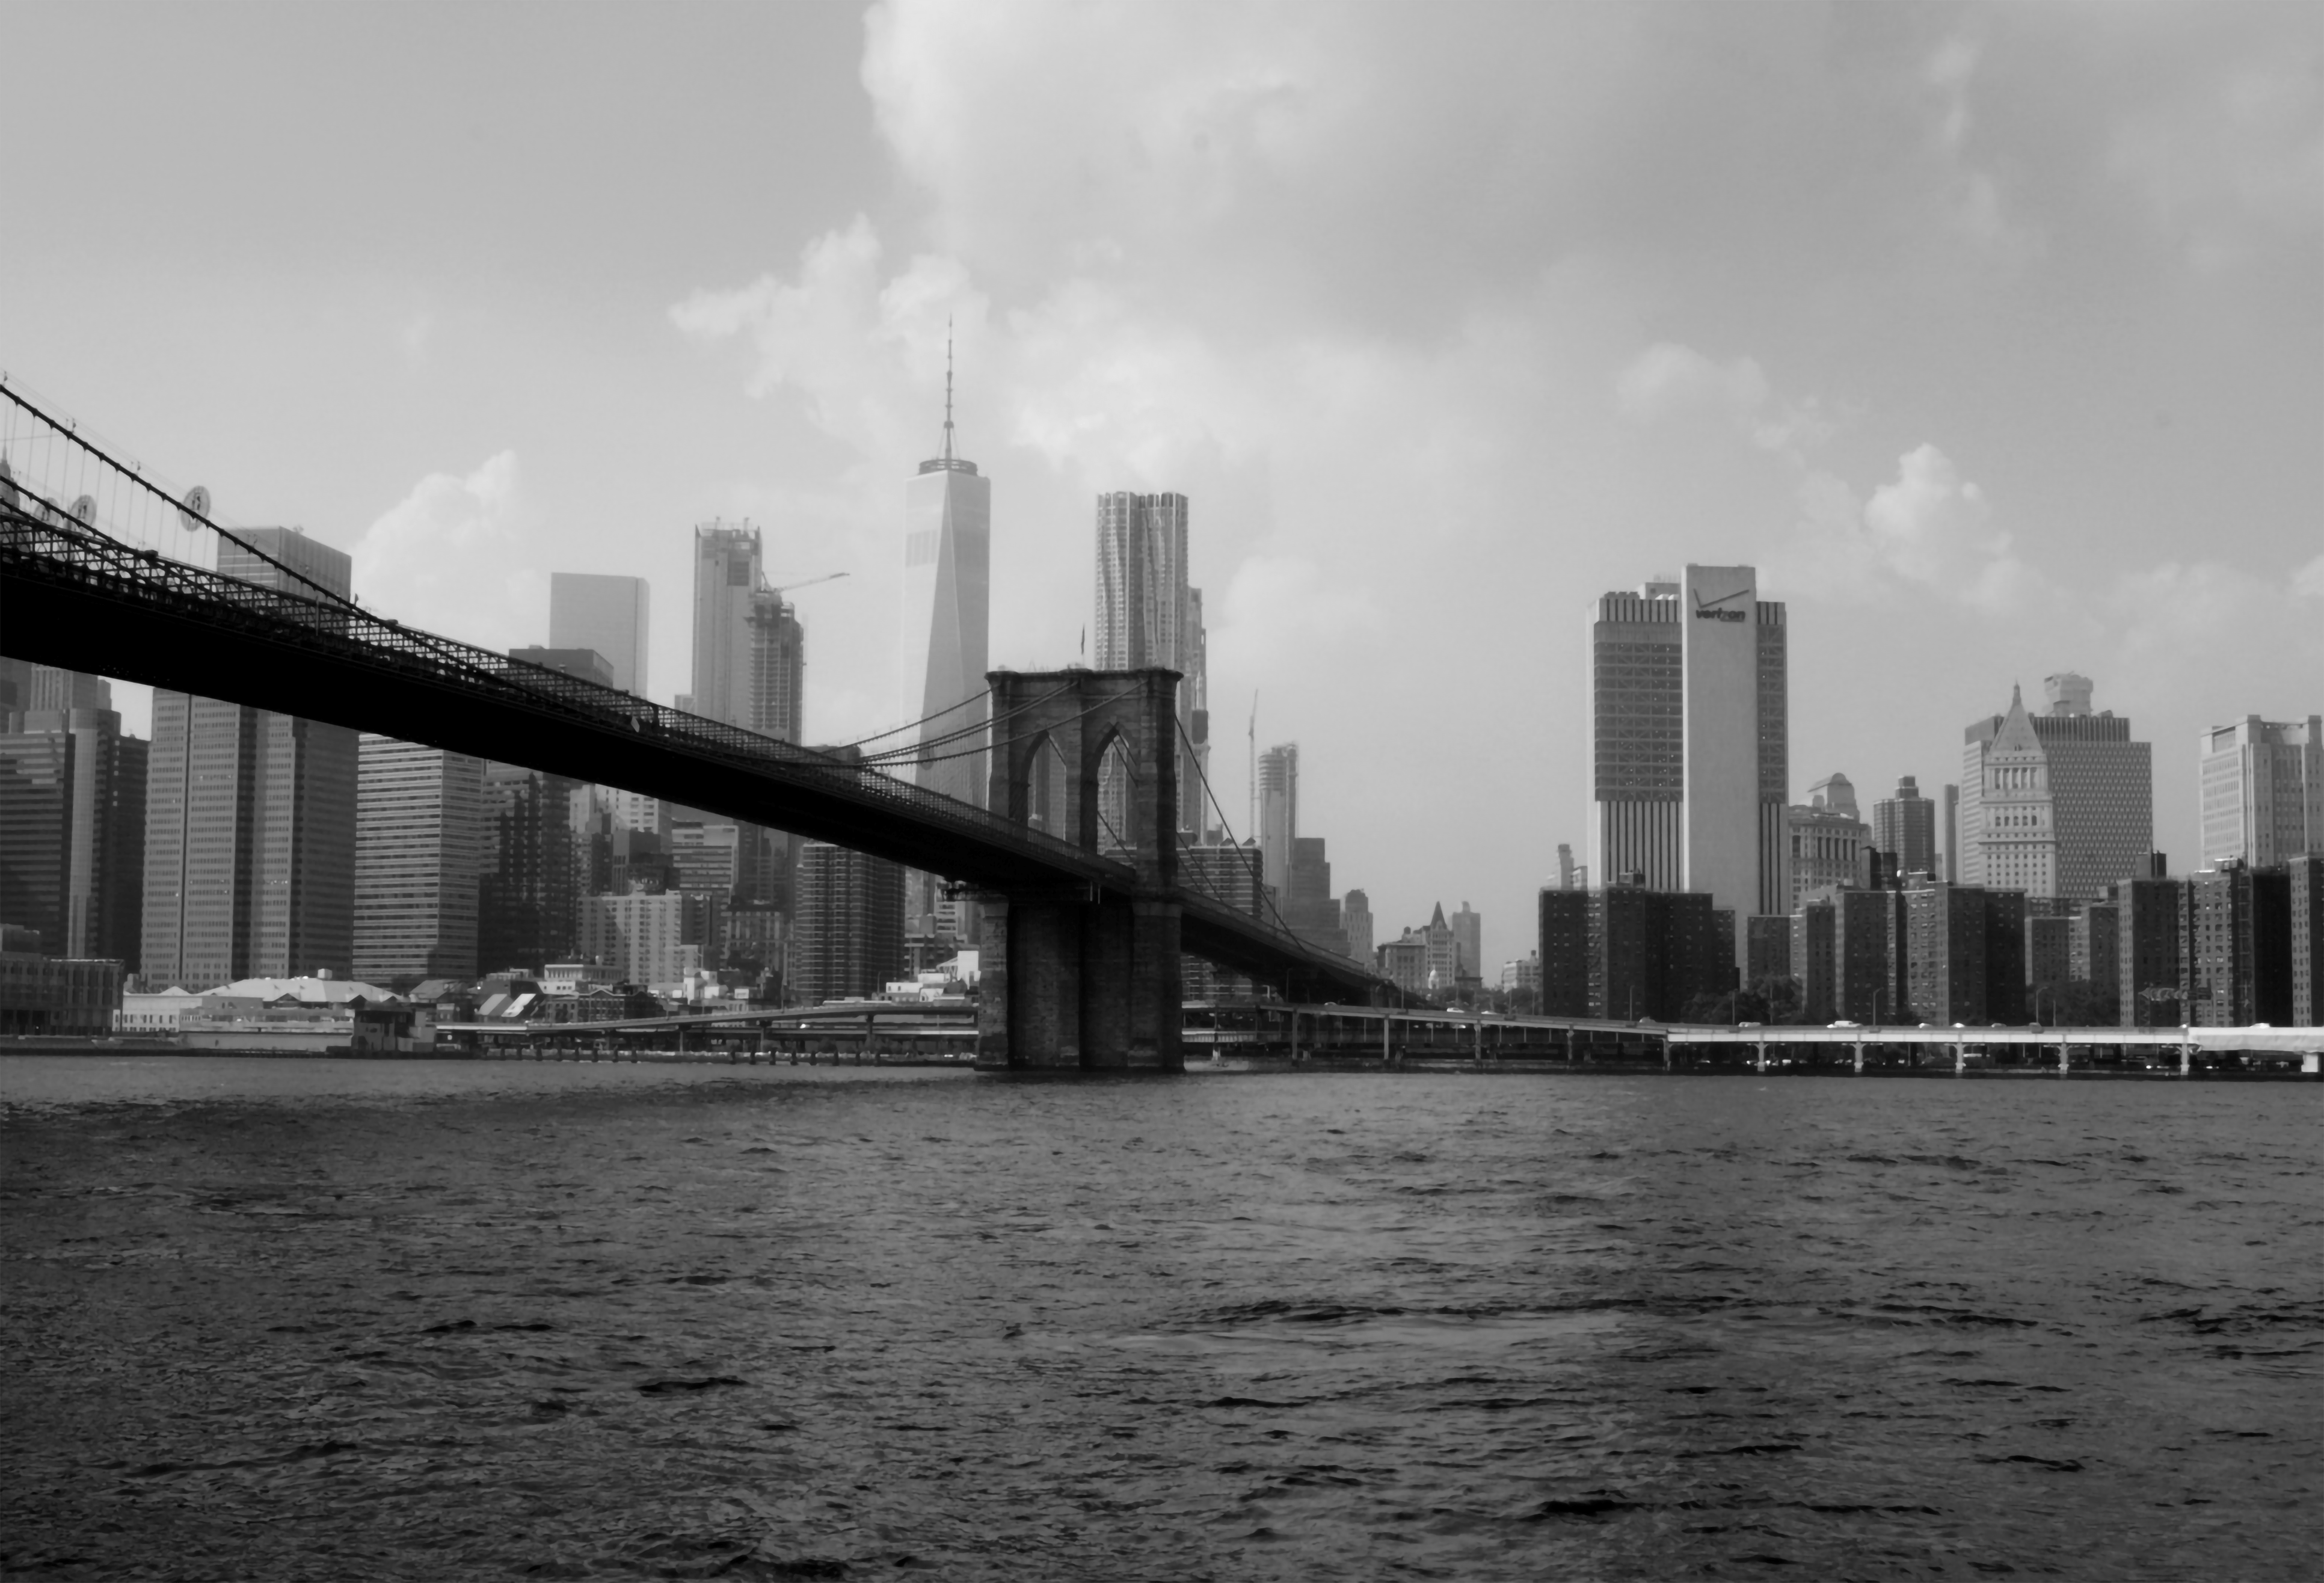
In the video above, I accomplished the Ken Burns Effect by placing my starting keyframe on a focal point on the image’s far right side. I set my endpoint keyframes to move across the image’s far left side and reveal the Brooklyn Bridge looking toward Manhattan. The length of the clip (20 seconds) allowed me to space the keyframes 14 seconds apart and control the panning speed.
Use After Effects’ Parallax Effect to Give Your Images a 3D Look
Another editing technique seen in some documentaries and movies requires a little front-end work, skill, and patience, but can be accomplished using Photoshop and After Effects. The 2.5D or parallax effect is used to animate photos, newspaper articles, and graphics and is guaranteed to liven up those still images. The parallax effect manipulates the background in relation to the image foreground to produce an illusion of depth. This alternating motion between the foreground and the background produces a feeling of changing perspectives that pulls the viewer in.
Without getting too deep into the technicalities of how it’s accomplished (you can check out this excellent tutorial here) it helps to use a photo with a prominent foreground element against simpler midground and background elements. This will help create a greater sense of depth of field. Using Photoshop, the foreground, midground, and background elements are separated into individual layers and then manipulated in After Effects using adjustments to positioning, scaling, rotation, and x, y, and z axes.
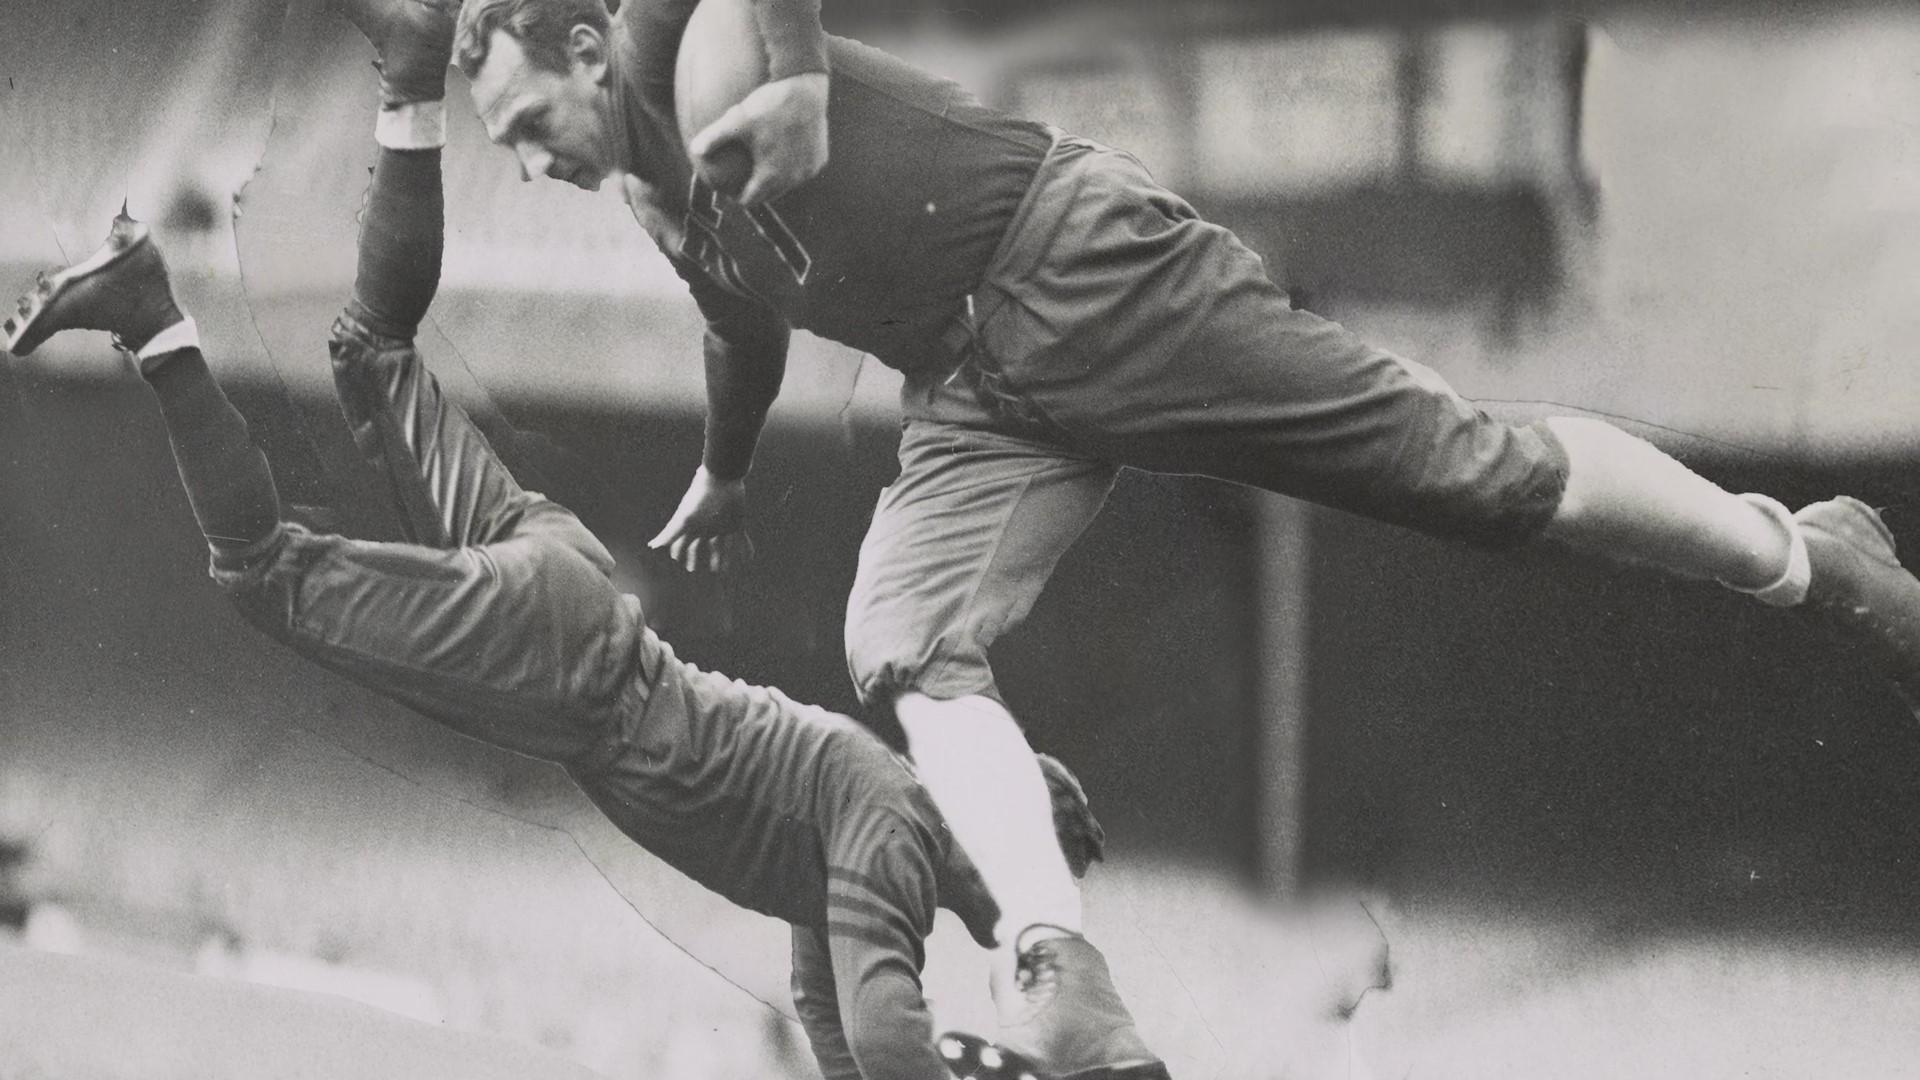
To try it out, I downloaded a free-to-use high-resolution photograph from the Library of Congress’s photo repository of two football players in action at practice. Separating the layers wasn’t too difficult but cloning the stadium background after removing the players took a lot more effort until I got something useable.
The video below is what I ended up with.
Overall, I was pleased with my freshman attempt. At a minimum it added some life to the still photo, which was my goal. When I use this technique again, I’ll take my time preparing the photo in Photoshop to get the best quality possible in After Effects.
Ready To Step Up Your Video Production Game?
When creating a professional video production, it helps to enhance its storytelling value by making it more enjoyable for your viewing audience. Try improving the quality of your on-screen text or adding some life to those still images using the professional techniques discussed above. If they work for documentary filmmakers, you can make them work for you, too!
Share This Story!
Related Posts

When it comes to visually recounting real life, no other storytelling vehicle does it better for me than the documentary film. Now, when I say documentary films, I don’t want to confuse it with reality television. I’m talking about documentary films based on facts—real people, real places, and real events most often portrayed on screen using images and other archival footage.
If you’ve ever watched Ken Burns’ films—Jazz, The Civil War, Unforgiveable Blackness, and The West—you’ve seen how he masters the arts of using still images to enhance the visual and emotional impact of the stories he tells. Because there was little to no video footage to document the events portrayed on screen other than archived images, Burns applies simple effects to them in post-production to mimic the motion of video and bring them to life..
In this post, I’ll consider three editing techniques favored by documentary filmmakers you can use in your videos to enhance your video storytelling beyond the worn out and boring zoom, pan, and fade photo slideshow.
Enhance The Look of Your On-Screen Text
Another thing I’ve always liked about Ken Burns’ films is his simple, effective use of on-screen text in titles and lower thirds. In his nine-part documentary, The West, the film’s opening title is revealed in a large western-style serif font against the backdrop of breathtaking scenery and the haunting sounds of a Native American folk song.
When introducing episodes and subchapters, and rolling credits, Burns uses white text against a black screen and lets the audio soundtrack do its work. His choice of lower third overlays when introducing an expert on-screen is equally conservative—the expert’s name in all caps, and their professional title in mixed capitals just beneath their image. It’s not fancy, but his typography choices fit his production and keeps the focus on the story being told.
When used appropriately, on-screen text and lower thirds can enhance the introduction of still images in a video production. For example, in the video below, I introduce my graphic design portfolio using both the Ken Burns effect and a simple animated text to display the quote heard on the audio track. The text introduces me as the narrator and enhances the image’s connection to creativity while blending in with the soft music bed.
I used a couple of free After Effects title templates to create the quote and introduction title sequences. There are lots of free title motion graphics for After Effects and Premiere Pro available from sites like Premium Beat, Mixkit, and Motion Array, among others, if you’re interested in using or creating professional-looking animated text for your videos.
Use The “Ken Burns Effect” On Still Images
He didn’t invent it, but Burns pioneered the use of slow panning and zooming of still images, so much a staple in his films, it is now known as The Ken Burns Effect. You can use this technique in your videos. Non-linear editing software such as Adobe Premiere Pro and Final Cut allow users to set keyframes to control and seamlessly change image positioning and scaling.
Burns often starts by zooming in on a particular area of an image, far away from his intended end focal point. After the narration and/or audio track commences, the image begins to move and zoom out ever so slowly until the end focal point is revealed in the photo. The technique captures the viewer’s curiosity as he tries to imagine what is to come next. The speed of the motion across the image is dependent on keyframe spacing in relation to the clip length and any adjustments made to temporal interpolation—keyframe changes in time—in the editing software. Typically, the further apart the keyframes and the longer the clip, the slower the motion.
For this to work, you’ll need to use a photograph larger than your editing space to give you enough room for zooming and panning. In the example below, my editing space was set for 1920×1080 pixels. I used an image which measured 3864×2632 pixels, which gave me enough horizontal and vertical headroom with which to work.
A word of caution here. Resist the urge to upscale the image significantly in your video editing program or you could run into problems with pixelation and degradation of image quality. If the image you want to use is not large enough, you could rescan it or upscale the image in Photoshop or another image editing program as I did below.
In the video above, I accomplished the Ken Burns Effect by placing my starting keyframe on a focal point on the image’s far right side. I set my endpoint keyframes to move across the image’s far left side and reveal the Brooklyn Bridge looking toward Manhattan. The length of the clip (20 seconds) allowed me to space the keyframes 14 seconds apart and control the panning speed.
Use After Effects’ Parallax Effect to Give Your Images a 3D Look
Another editing technique seen in some documentaries and movies requires a little front-end work, skill, and patience, but can be accomplished using Photoshop and After Effects. The 2.5D or parallax effect is used to animate photos, newspaper articles, and graphics and is guaranteed to liven up those still images. The parallax effect manipulates the background in relation to the image foreground to produce an illusion of depth. This alternating motion between the foreground and the background produces a feeling of changing perspectives that pulls the viewer in.
Without getting too deep into the technicalities of how it’s accomplished (you can check out this excellent tutorial here) it helps to use a photo with a prominent foreground element against simpler midground and background elements. This will help create a greater sense of depth of field. Using Photoshop, the foreground, midground, and background elements are separated into individual layers and then manipulated in After Effects using adjustments to positioning, scaling, rotation, and x, y, and z axes.
To try it out, I downloaded a free-to-use high-resolution photograph from the Library of Congress’s photo repository of two football players in action at practice. Separating the layers wasn’t too difficult but cloning the stadium background after removing the players took a lot more effort until I got something useable.
The video below is what I ended up with.
Overall, I was pleased with my freshman attempt. At a minimum it added some life to the still photo, which was my goal. When I use this technique again, I’ll take my time preparing the photo in Photoshop to get the best quality possible in After Effects.
Ready To Step Up Your Video Production Game?
When creating a professional video production, it helps to enhance its storytelling value by making it more enjoyable for your viewing audience. Try improving the quality of your on-screen text or adding some life to those still images using the professional techniques discussed above. If they work for documentary filmmakers, you can make them work for you, too!